IPv6 OSPF Virtual Link Sim
Question
Acme is a small export company that has an existing enterprise network that is running IPv6 OSPFv3. Currently OSPF is configured on all routers. However, R4′s loopback address (FEC0:4:4) cannot be seen in R1′s IPv6 routing table. You are tasked with identifying the cause of this fault and implementing the needed corrective actions that uses OSPF features and does no change the current area assignments. You will know that you have corrected the fault when R4′s loopback address (FEC0:4:4) can be seen in the routing table of R1.

Special Note: To gain the maximum number of points you must remove all incorrect or unneeded configuration statements related to this issue.
Answer and Explanation:
To troubleshoot the problem, first issue the show running-config on all of 4 routers. Pay more attention to the outputs of routers R2 and R3
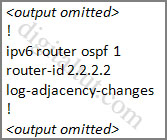
The output of the “show running-config” command of R2:
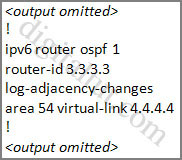
The output of the “show running-config” command of R3:
We knew that all areascommand.
+ Configure virtual link on R2 (from the first output above, we learned that the OSPF process ID of R2 is 1):
R2>enable
R2#configure terminal
R2(config)#ipv6 router ospf 1
R2(config-rtr)#area 11 virtual-link 3.3.3.3
(Notice that we have to use neighbor router-id 3.3.3.3, not R2′s router-id 2.2.2.2)
+ Configure virtual link on R3 (from the second output above, we learned that the OSPF process ID of R3 is 1 and we have to disable the wrong configuration of “area 54 virtual-link 4.4.4.4″):
R3>enable
R3#configure terminal
R3(config)#ipv6 router ospf 1
R3(config-rtr)#no area 54 virtual-link 4.4.4.4
R3(config-rtr)#area 11 virtual-link 2.2.2.2
We should check the configuration on R4:
R4>enable
R4#show running-config
You will see a wrongly configured virtual-link command. To get full mark we have to disable this command:
R4#configure terminal
R4(config)#ipv6 router ospf 1
R4(config-rtr)#no area 54 virtual-link 3.3.3.3
After finishing the configuration don’t forget to ping between R1 and R4 to make sure they work well!
Now all the configuration was done. It is weird that we can’t ping the IPv6 loopback interface of R4 (with the ping or ping ipv6 command) but we can check by using the command show ipv6 route on R1
The copying running-config startup-config command will not work but don’t worry, just skip it.
Notice: If you issue the command “show running-config” on R1, you will see these two lines:
passive-interface default
no passive-interface fa0/0 (fa0/0 is the interface connecting with R2)
These two lines make all the interfaces of R1 become passive interfaces except interface fa0/0. They are correctly configured so don’t try to disable them.
'IT Study > Network 자격증' 카테고리의 다른 글
| [CCNP 642-902 Router ] [ EIGRP Stub Sim ] CCNP Sim 문제 (0) | 2014.01.06 |
|---|---|
| [CCNP 642-902 Router ] [ EIGRP OSPF Redistribution Sim ] CCNP Sim 문제 (0) | 2014.01.06 |
| [CCNP 642-902 Router ] [ CCNP EIGRP OSPF Redistribution Sim ] CCNP Sim 문제.1 (0) | 2013.12.04 |
| [CCNA 642-813 , 200-120] [ CCNA Configuration SIM Questio ] CCNA 문제 (0) | 2013.09.16 |
| [CCNA 642-813 , 200-120] [ CCNA DUMP ] CCNA R&S 문제 번역 (0) | 2013.09.13 |


